Get in Touch with Liehuang Company
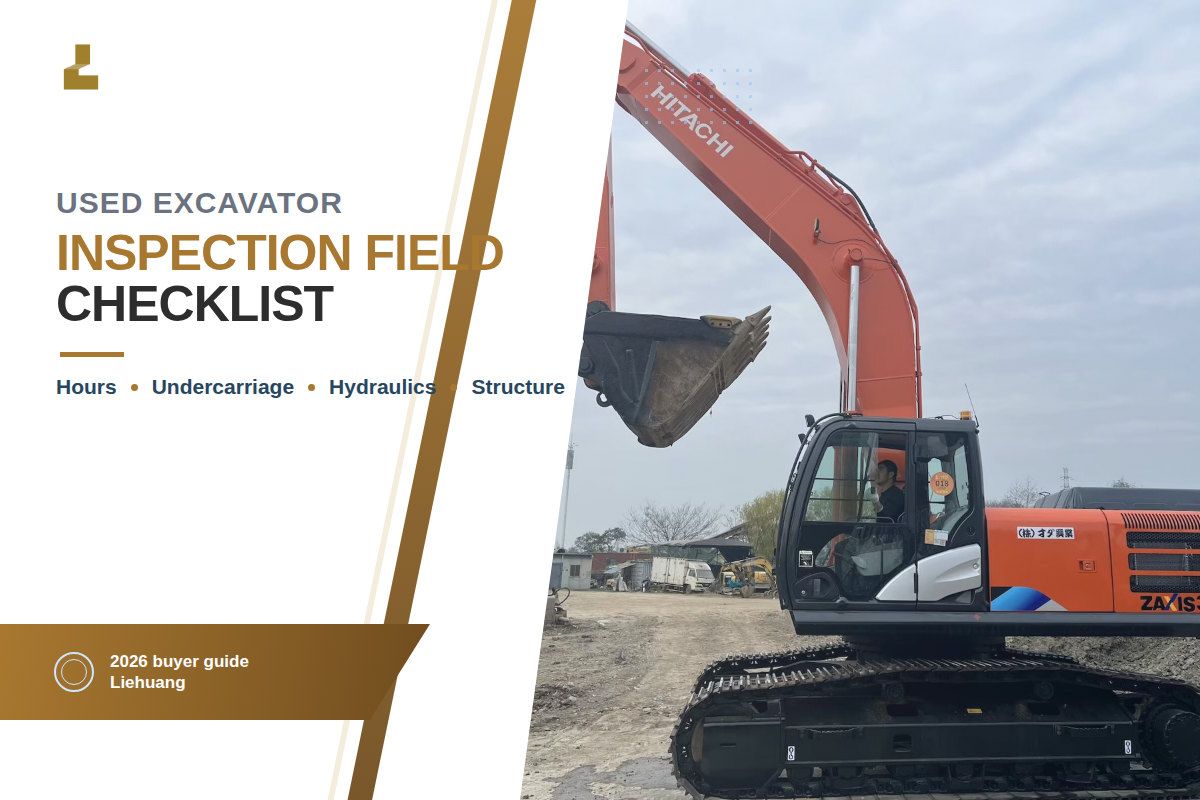

Knowing how to inspect a used excavator is the difference between a machine that makes money and one that sits in the shop bleeding your wallet dry. A fresh paint job and a low hour meter tell you nothing about the parts that cost the big money — the undercarriage, hydraulics, boom and stick, and swing bearing. Here’s how a professional appraiser runs a used excavator inspection, step by step.
Used Excavator Inspection at a Glance
| Time needed | 1–2 hours for a thorough walk-around plus a test operation |
| Tools to bring | Track measuring group, tape measure, magnetic dial indicator, stopwatch, flashlight, and a clipboard or phone camera |
| Documents to request | Service records, hour/ECM report, model and serial number, ownership history |
| Top 5 deal-breakers | Re-welded boom cracks, worn-out undercarriage, milky hydraulic fluid, blue exhaust, and missing service records |
Why a Pre-Purchase Inspection Matters Before You Spend a Dollar
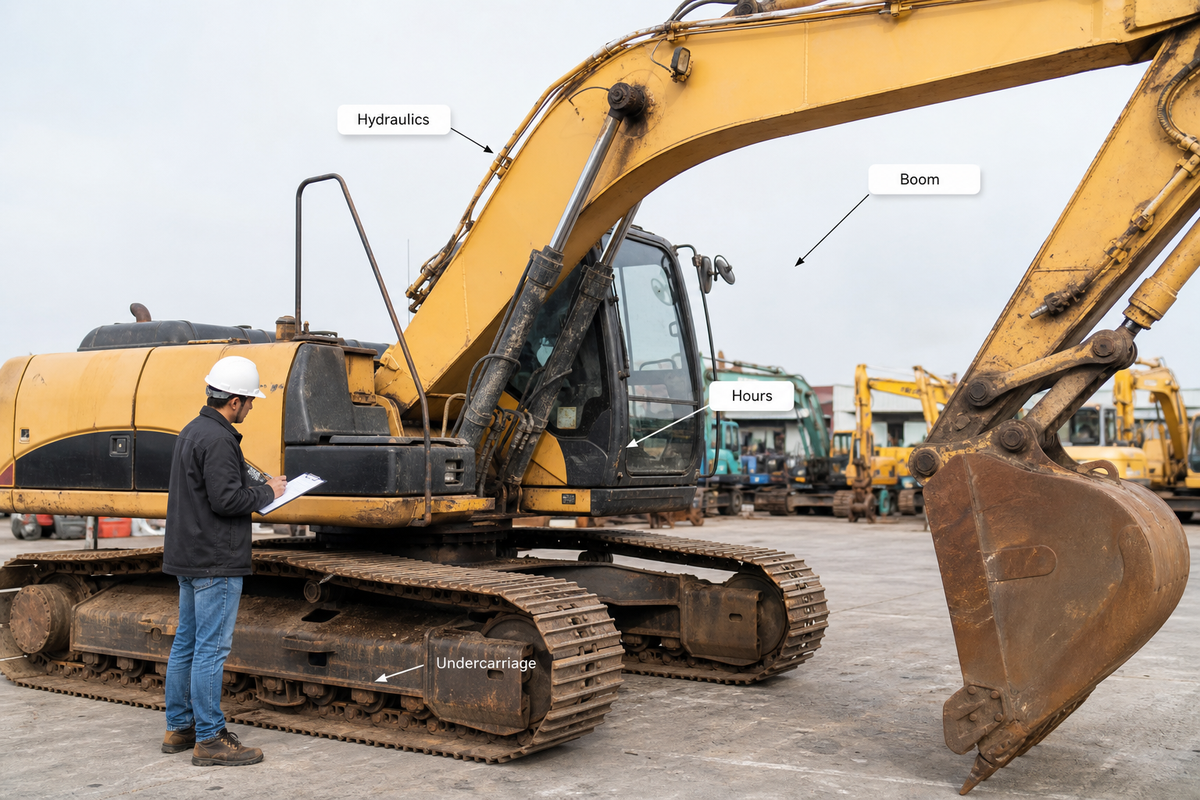
Buying a used excavator is a bet on parts you cannot see from the seat. The undercarriage — the most expensive component group on a tracked excavator — contributes roughly half of the machine’s total lifetime ownership and maintenance cost, yet it is the last thing most buyers examine. On a 20-ton machine, a full undercarriage replacement runs around $12,000, a hydraulic pump $12,000–$15,000, and a single boom or stick cylinder reseal about $2,500. If you fail to spot the wear on any of those in a fifteen-minute peek, you’ve just purchased the most expensive equipment in your fleet.
A good inspection helps you turn risks into negotiation points. Each worn part you find and catalog is an opportunity to reduce the asking price, or a reason to walk away entirely. Given the rapid depreciation of new heavy equipment (an estimated 20-25% for most machines in their first year), purchasing used automatically saves you the brunt of the cost. However, a detailed inspection ensures you are protecting that saving. You can calculate these potential savings with our used vs new depreciation savings calculator.
💡 Key takeaway
Use the inspection as an opportunity to gather information and price a potential purchase-not simply as a routine step in the buying process.
The objective is to build a defensible list of necessary repairs and their associated costs, not a yes/no decision.
What to Bring: Tools and Documents for the Inspection
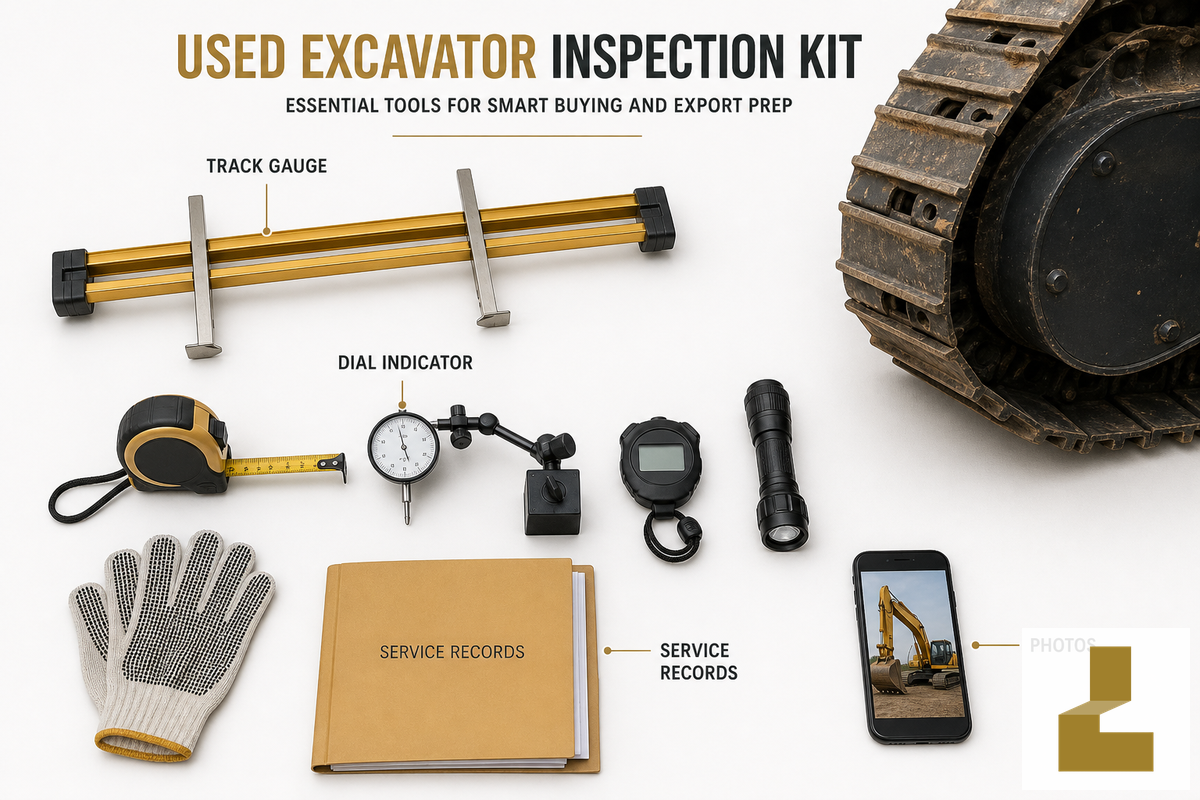
Showing up to a pre-purchase inspection with the right equipment distinguishes the experienced professional from the hopeful amateur. With just a few affordable tools, you can measure wear rather than estimate it. As one seasoned excavator appraiser put it, “there’s no sticker to let you know what you’ve got, so you’ve got to measure.”
- The Tools You Need for a Used Excavator Inspection: Track Measuring Group ($250 on average from a dealer). This set usually includes a caliper, depth gauge, and ruler to check undercarriage wear.
- Magnetic Dial Indicator. Used to determine how much play is present in the swing bearing.
- Stopwatch and 25’ Tape Measure. To measure the duration of hydraulic cycles and ensure the boom and stick are within spec for length.
- Flashlight, Rag, Gloves, Notepad, or Phone Camera. Essential for inspecting for leaks, checking oil condition, and documenting the condition of the equipment.
Equally important, get the paperwork ahead of time: full service history, the machine’s hour meter or ECM hours, the make and model (often found at floor level outside right of the cab), serial number and ownership. A dealer or seller unwilling to provide records is waving a big red flag. Whether it’s exterior wear, interior parts, load performance, or even dealer reputation-all these and more matter. And quality sellers embrace inspection rather than resisting it.
Start With the Hours and Service Records
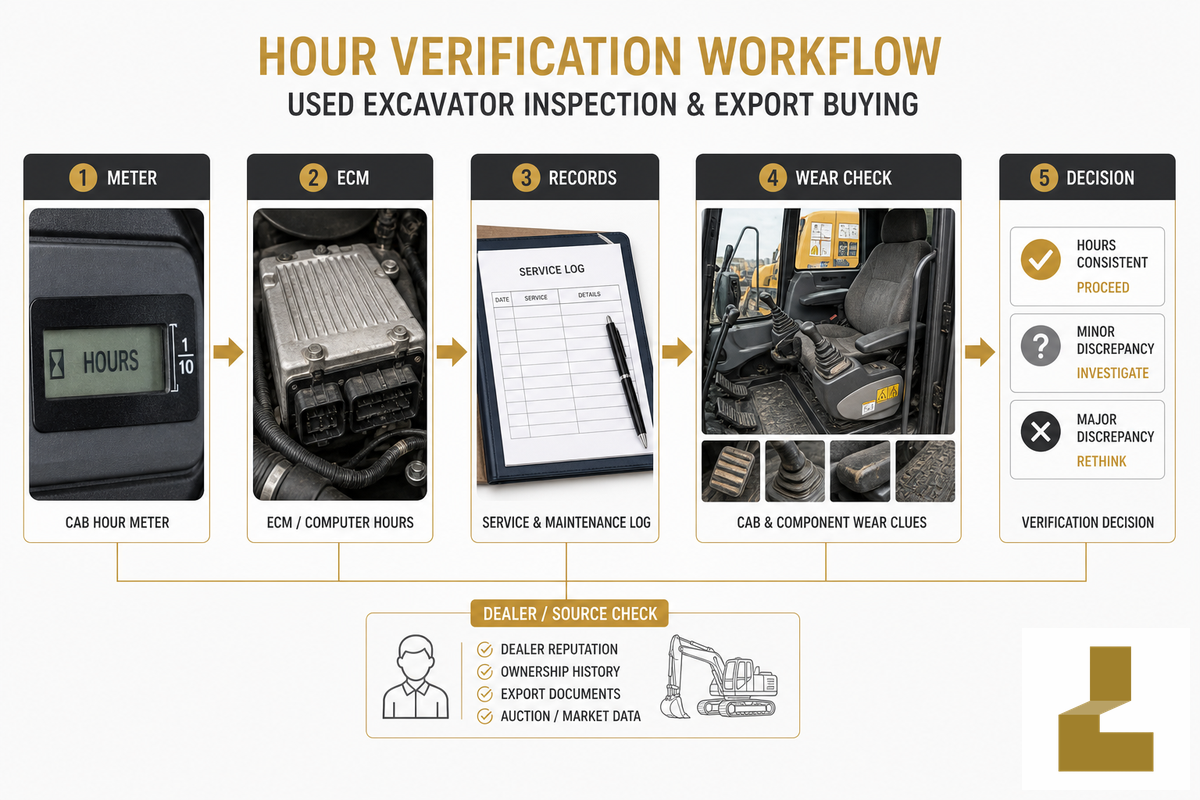
Hours are the first metric many buyers consider and arguably the most misleading. An hour meter reading only has significance when you have service history behind it. The widely held wisdom among operators: An undercarriage in reasonable condition can still make for a good buy on a machine under roughly 6,000 hours, assuming proper service, whereas a poorly maintained low-hour machine can be worse value than a well-documented machine with many more hours. Service history trumps raw hours.
How Many Hours Is Good for a Used Excavator?
Thresholds vary greatly by machine class and, above all, by service history rather than age alone. As general guidelines, here are rough cautionary areas that might prompt additional scrutiny, rather than strict hard stops:
| Excavator class | Caution zone (hours) | What drives the number |
|---|---|---|
| Mini / compact (≤10 t) | ~5,000+ | Lighter duty; rubber tracks and pins wear early |
| Standard (10–30 t) | ~8,000–10,000 | Most common resale band; service history decides value |
| Heavy (30 t+) | ~12,000–15,000+ | Built for long life; undercarriage cost dominates |
Data on the typical lifespan of construction equipment suggests that many standard hydraulic excavators leave primary production somewhere in the 8,000-10,000-hour range, but “leave primary production” doesn’t necessarily mean “worn out.” A 10,000-hour unit with all of its dealer-stamped service history can far outperform a 4,000-hour unit run hard and rarely greased.
⚠️ Watch for rolled-back hours
Hour meters have been known to be swapped or turned back. The evidence typically lies in inconsistencies: excessively worn controls and pedals and a shining new meter, or seat wear and floor wear that are not consistent with the advertised hours. One definitive verification is having the machine’s computer hours, or ECM hours, checked at the dealer and cross-referencing the number with service records. If the dealer will not perform an ECM check, or if there are no records to check, do not rely on the stated hours. You can also use our true-hours sanity checker to help you spot it.
Inspecting the Undercarriage, Where the Big Money Hides
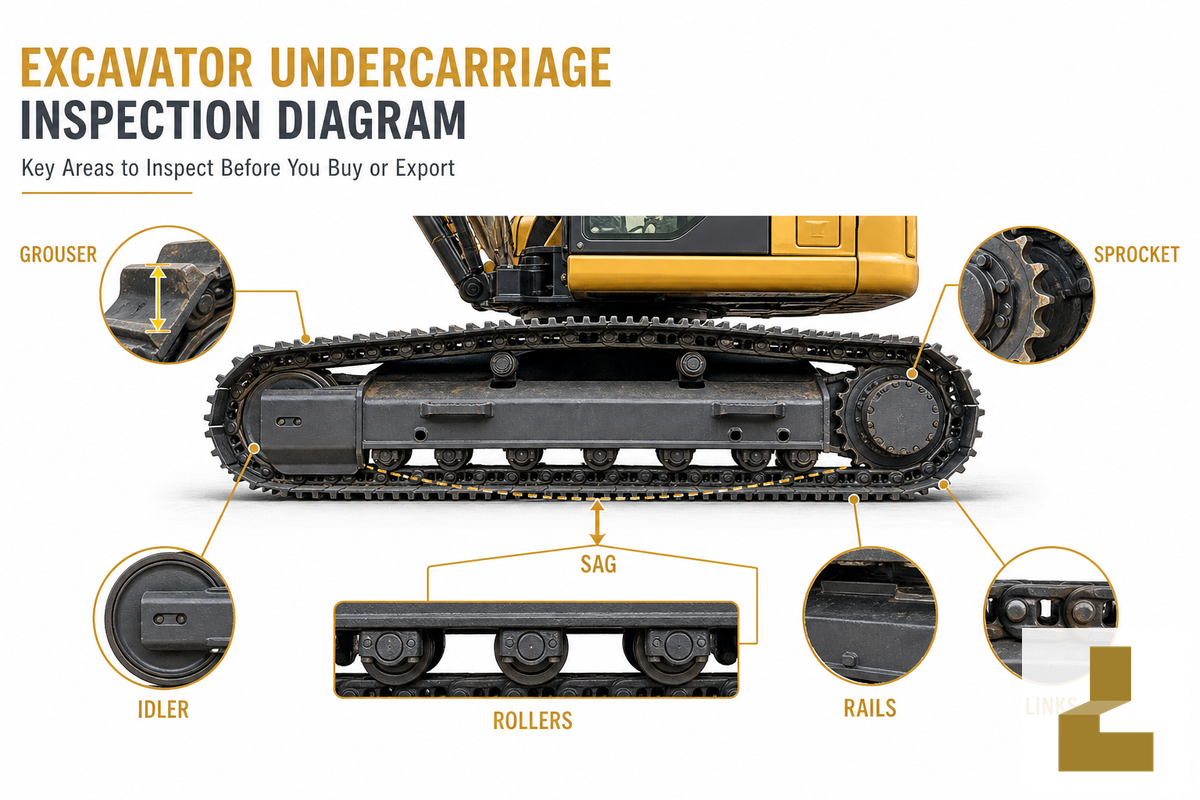
If there is only one component that you would inspect, make sure that it’s the undercarriage. As approximately 50% of a machine’s total lifetime repair costs may involve this one component, ensuring a proper evaluation of the undercarriage can either save or cost you thousands. The number one mistake buyers make is relying solely on visual inspection to assess undercarriage condition. Even individuals with many years of experience claiming they can judge the remaining life in a set of tracks or grousers are generally fooling themselves; measuring is the only way to truly know.
The undercarriage is a complex and interdependent system composed of five wear components: grousers, rails/links, sprockets, and guide and carrier rollers, which all wear at different rates. A machine advertised as a “60 percent undercarriage” could mean 70 percent wear in chains and 40 percent wear in rollers, or vice versa. That is why measuring each component separately matters.
📐 Engineering Note — Measuring undercarriage wear
Measure the wear on each of the undercarriage components (rails, sprockets, carrier rollers and guide rollers) using a track measuring gauge, then compare the readings to the new and limit-use wear dimensions in the service manual or from an OEM dealer.
- Grousers: Lay depth gauge across the pad, set rod to the depth gauge’s setting and read the ruler.
- Rails: Measure from the outside edge of one pin to the outside edge of the pin five pins away (this catches internal pin and bushing stretch.)
- Links, rollers, sprockets, bushings: Measure link height, individually measure outer diameter of all rollers and examine sprocket teeth for “pointedness.”
Add the component readings into an overall percentage of remaining life, then price the shortfall. On a 20-ton machine a full undercarriage replacement runs about $12,000, so a “50% undercarriage” is a real five-figure liability you factor into the offer.
⚠️ The “missing link” trick
When pins and bushings wear out, the track slackens, the front idler comes forward, and once it has reached its front limit, some owners take a link out to keep the track looking tight. This symptom can hide massive internal wear in other components.
Compare the number of track links on the machine to how many it should have; a short count means trouble, not a deal.
Also check for oil on the rollers and the front idler and the track frame for dents or large areas of rust or damage. On smaller machines, you can pick the side of the blade and boom up and take the tension off of the track to get at the rollers, but never put your body under the machine in any other scenario.
Checking the Hydraulic System
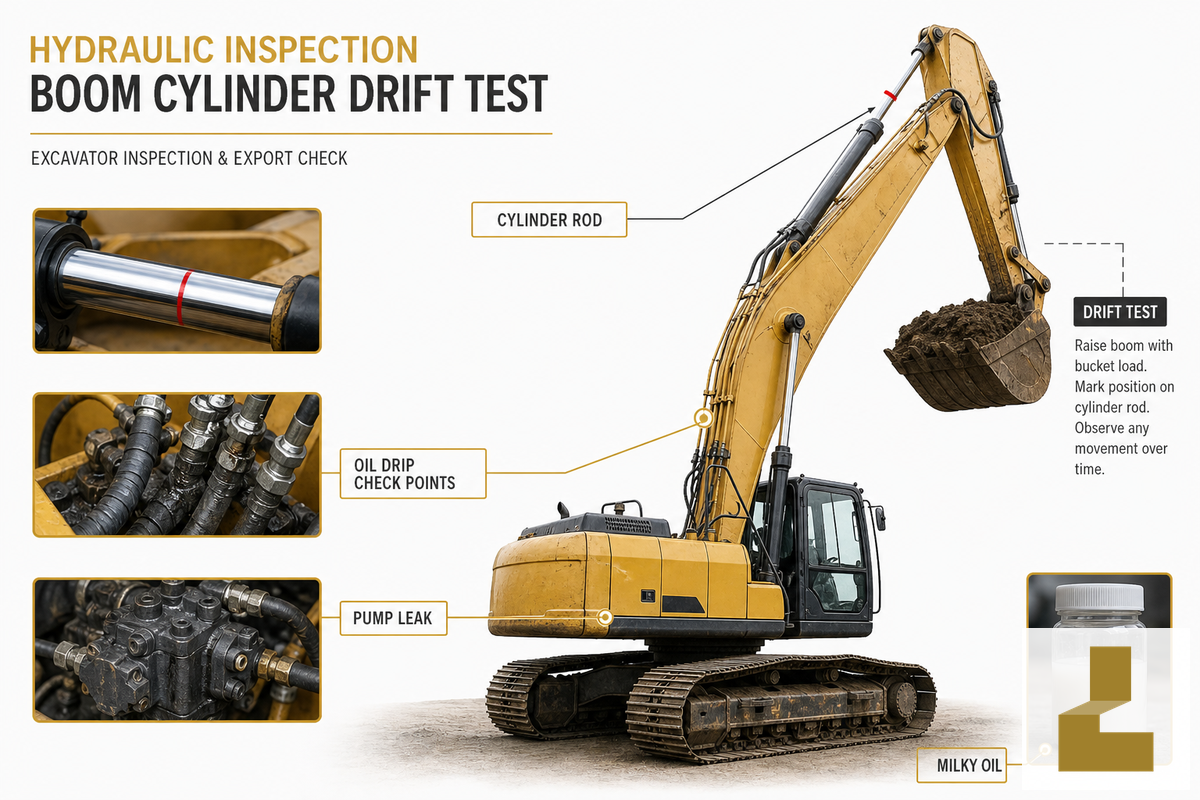
The hydraulic system is where small problems can hide big repair bills. Since the machine is first and foremost hydraulic, it is important to check this area closely. In the morning when cold, get under the machine and look underneath for any leaks. Small drips from seals are relatively cheap to repair, but drips out of the hydraulic pump mean that a full replacement is on the horizon and is a very expensive item. Inspect the rods on all cylinders for leakage. Resealable boom and stick cylinders run about $2,500 each to fix. Look at all of the hoses for cracking, abrasion, and tears.
Do the definitive test: drift test. It is not a myth. It’s exactly what an inspection would test. According to OSHA’s construction equipment inspection standard, a defect is “drifting due to fluid leaking past the piston.” To test the hydraulic cylinders:
Cylinder drift test (creep test)
- Boom the machine up with a load in the bucket. Then turn the machine off.
- Wipe oil off the boom cylinder rod and put a mark at a reference point.
- Wait five minutes.
- Measure how far down the boom has moved. A small amount is normal. Large drift suggests wear or bypass within the valve body or cylinders.
As you test, look at the color and clarity of the hydraulic fluid and engine oil. If either looks milky or foamy, it indicates water or coolant contamination, a deal-killer on many machines. Listen too: excessive noise, vibration, poor speed, or overheated fluid can signal a tired pump.
Engine, Fluids, Cab and Electrical Checks
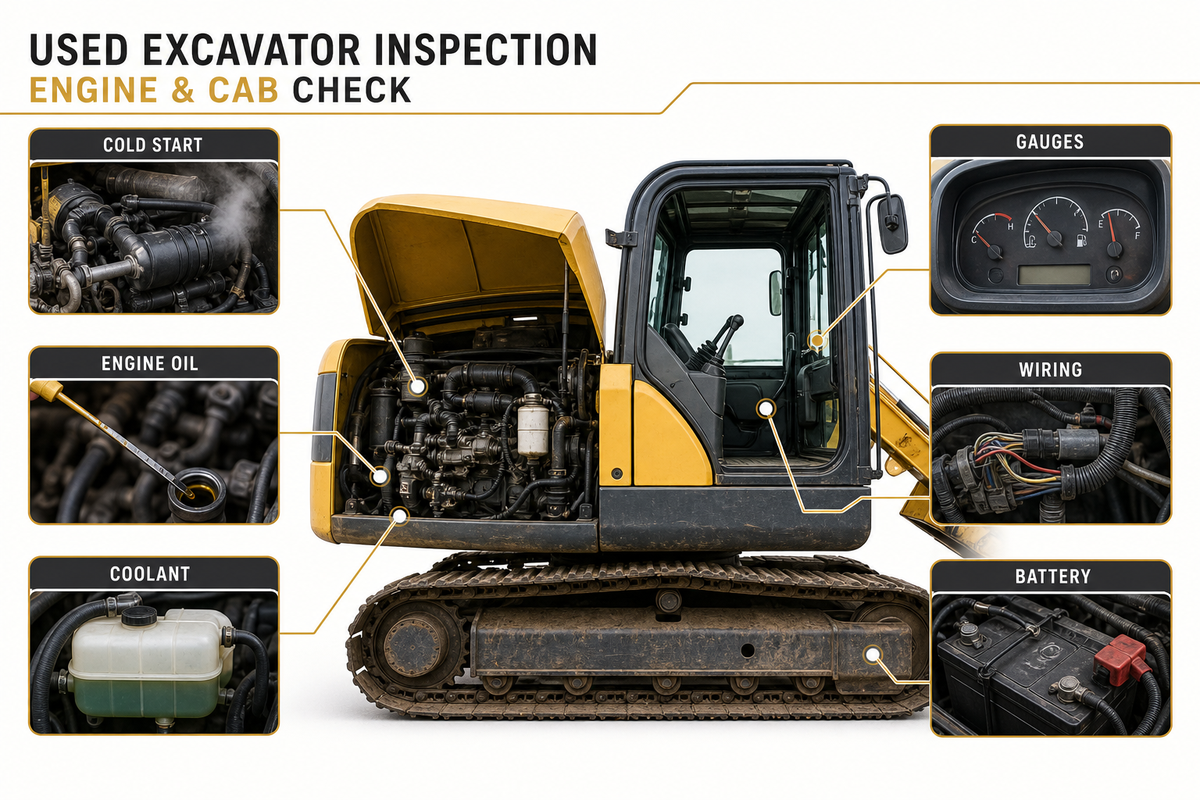
Engine and cab together reveal how a machine was maintained. Turn the key and start the machine cold; observe the exhaust: A short puff is normal on start, but blue exhaust over time signals burning oil (worn rings or valve seals), persistent white can mean coolant entering the cylinder, and thick black smoke shows fuel delivery or air intake issues. Check the engine oil on the dipstick for the extent of blackening and feel for blow-by around the tube. Ensure coolant is at the proper level, free of oil sheens.
Once in the cab, position yourself as the operator would all day. Is the seat torn? Do the gauges function? Are the controls and transmission responsive, and is there cracked or missing glass? A dinged-up cab can indicate rough operation. Finish by testing electrical basics: lights on/off, intact wiring, and a secure battery with clean connections. A new feature on most machines: tap the onboard computer diagnostic display for codes; on a low-hour, high-value machine, invest in a history/diagnostic report from an OEM dealer.
Structural Inspection: Boom, Stick, Bucket and Swing
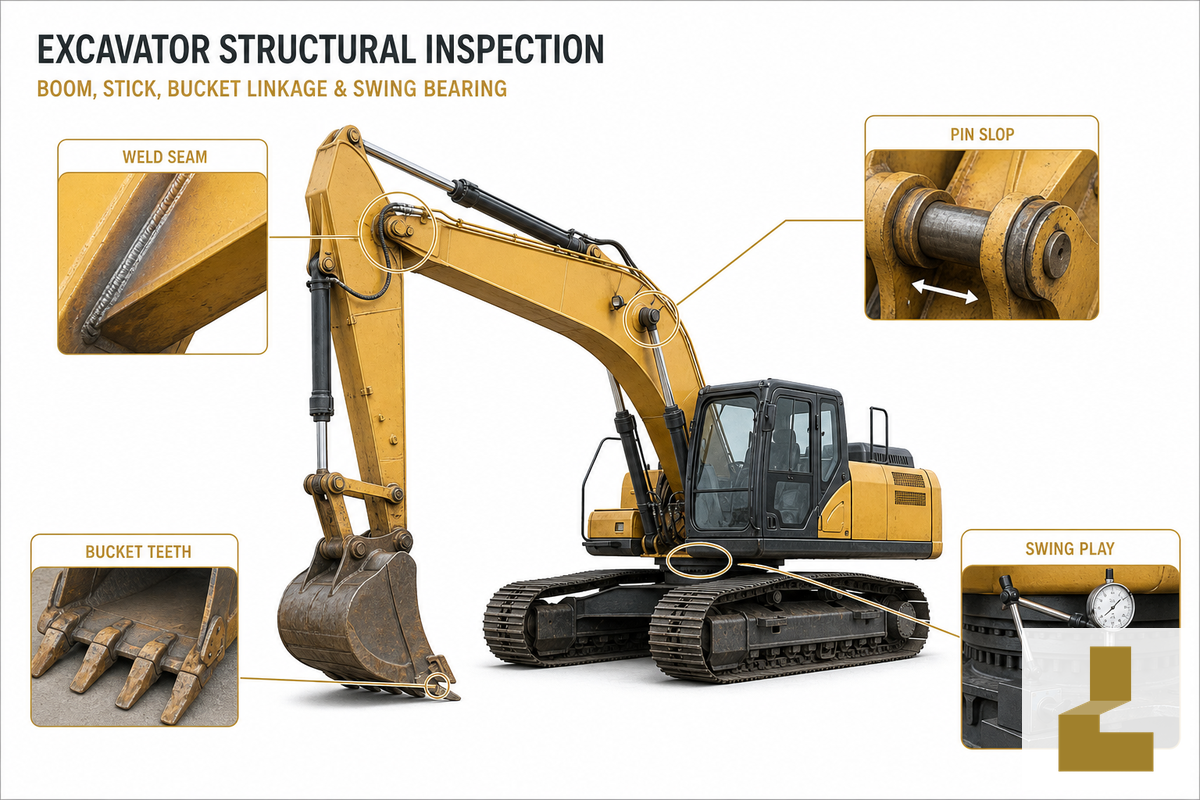
Missing a crack in the machine’s structure gets expensive, since it points to abuse. Follow the boom and stick’s entire length looking for cracks, especially at the weld seams. Any areas where a plate has been welded on over a crack, indicating the machine experienced stress beyond its design, are a big red flag. As appraiser Howard Abell puts it, the presence of cracks in a machine can lower its value by 20%.
“Cracks reduce a machine’s value by about 20%. Small to midsize excavators with cracks, I tend to steer clear of.”
Now check the pins and bushings on the machine’s linkages. Have your operator position the machine so he can apply and release the bucket’s down-pressure, while you closely observe each bushing on the machine for excessive movement. Looseness is a dead giveaway that a machine led a hard, under-greased life.
“Loose pins and bushings are a clear indication of the wear and tear that machine has experienced and they typically let me know that they’ve not been greasing that machine well enough.”
📐 Engineering Note — Swing bearing (slew ring) play
The swing bearing is a costly replacement, so measure it rather than estimate it. On a 20-ton machine you should barely see any movement. Set a magnetic dial indicator against the turntable and take a reading at four quarter-turn positions (12, 3, 6 and 9 o’clock); the average tells you the condition of the slew ring. Visible movement on a machine this size generally means wear is well under way. Check the swing gearbox oil on the dipstick too — it should be clean, with no water present.
Don’t overlook the working end of the machine either. Are the bucket teeth and cutting edges worn, and do the included attachments fit and function correctly? Our guide to excavator bucket types and condition covers what to check on the working end.
The Test Operation: Put the Machine Through Its Paces
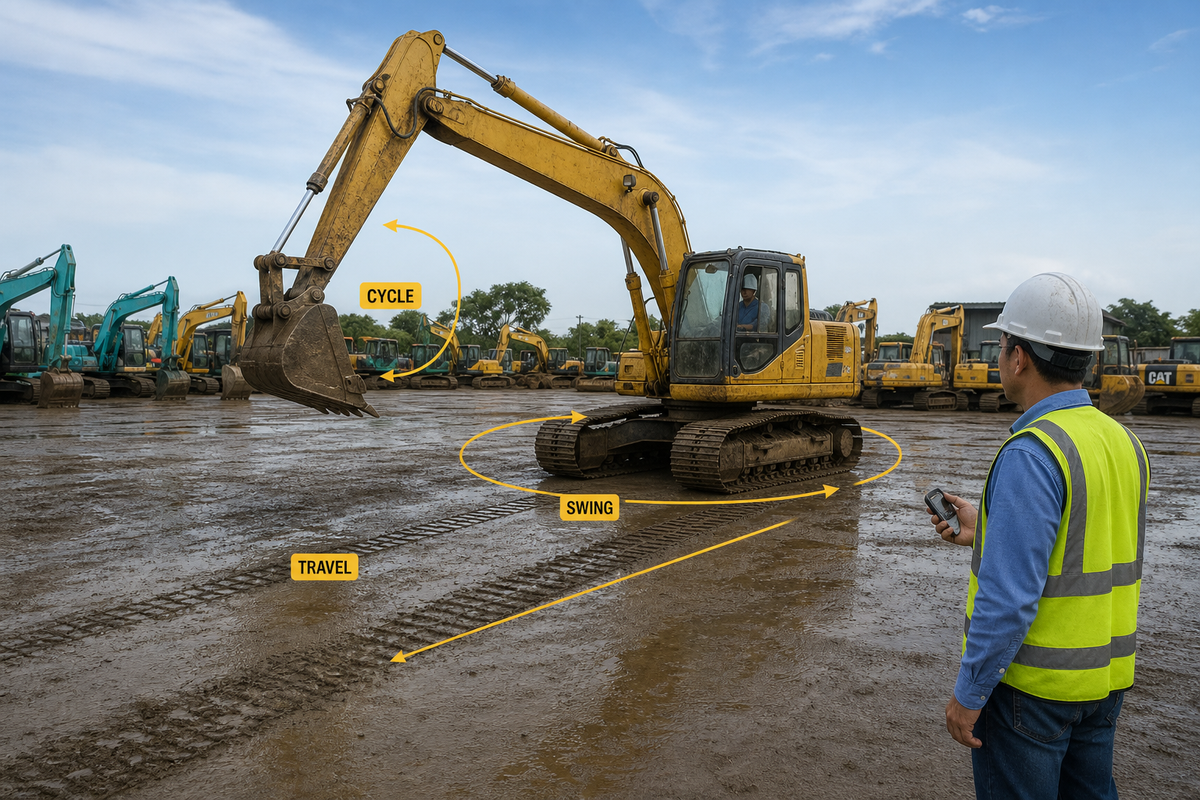
Static checks find damage; the test operation finds performance. OSHA’s construction equipment inspection model requires that a competent person perform a visual inspection before every shift and reassess conditions “in light of the observations made during operation” — meaning the machine has to be watched working, not just standing. Warm up the machine, then run the sequence below.
What Are the Key Operational Checks to Perform on an Excavator?
Four dynamic checks separate a strong machine from one on its last leg.
- Cylinder speed: Get out your stopwatch. Work each cylinder through its full range of motion: boom, stick, and bucket, three times. Take a measurement for each, then average the three measurements for each cylinder. Compare these to manufacturer-published performance specs; sluggish operation generally means weak hydraulics or tired cylinders.
- Swing function: Run the machine through a 360-degree rotation both ways and listen for any groans, grinding, or thuds in the swing bearing. The operation should be smooth and silent.
- Travel and tracking: Move the machine in a straight line in both forward and reverse, slowly. If the machine favors one direction or pulls, the track motor or pump on that side is probably losing pressure. Time three full track rotations for each side.
- Drift with load Perform your boom drift test again after the machine has warmed up to more accurately expose leaky cylinder seals.
Finish like the pros. Once the machine is thoroughly warm, do another visual check. Open the service panels and see if any fluids are weeping; this is especially useful for revealing issues with leaking hoses and seals under pressure. A dry machine while hot usually means you’ve got a winner.
Common Mistakes Buyers Make, and When to Walk Away
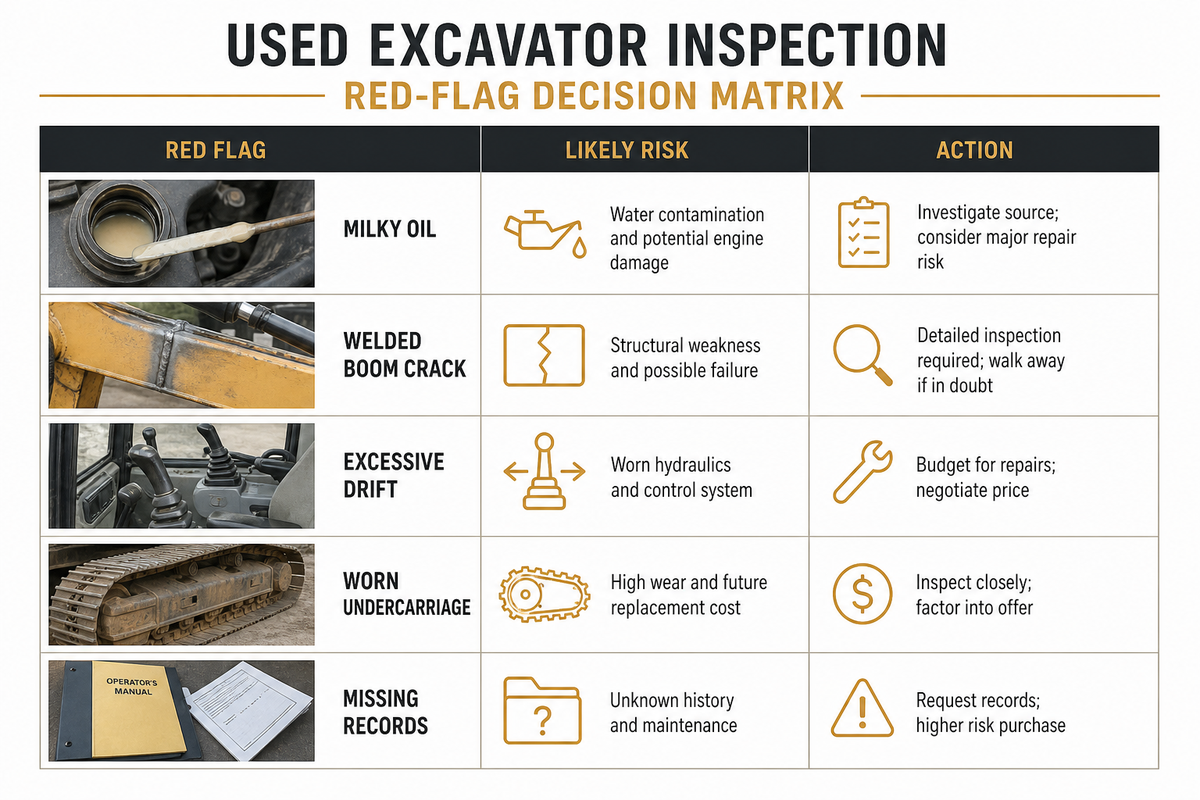
Used excavator deals fall apart when buyers focus only on cosmetics and make the same five purchasing errors: buying a machine based on the paint, forgoing undercarriage checks, assuming the hour meter accurately reflects machine condition, failing to perform a proper operating test, and purchasing without service records. None of these errors require more than an hour or so to correct; what’s important is knowing the rules beforehand and making sure your prospective machine meets them.
| Red flag | What it signals | Action |
|---|---|---|
| Milky/foamy hydraulic or engine oil | Water or coolant intrusion | Walk — major internal risk |
| Re-welded or plated boom/stick cracks | Overload, structural fatigue | Walk on mini/mid; heavy price cut + expert check on large |
| Excessive cylinder drift after 5 min | Worn packing or bypassing valves | Deduct reseal cost or walk |
| Undercarriage heavily worn on measurement | Near-term $10k+ replacement | Subtract replacement cost from the offer |
| Hours don’t match wear / fresh meter | Possible rolled-back hour meter | Demand ECM pull + records; walk if refused |
| No service records at all | Unknown maintenance history | Order a third-party inspection or walk |
You can’t hop on a plane to a yard for two hours with the track-measuring gauge, especially if the rig’s an ocean away. That’s where a third-party inspection or a vendor providing condition reports proves its worth. Otherwise, you can browse inspected used excavators for sale that already include condition reporting, or simply ask to see the machine’s inspection report and service records before you buy. And, to sanity-check total spend, our landed-cost estimator for imported excavators adds freight and duties on top of the machine price.
Industry Outlook: The Used Excavator Market in 2026
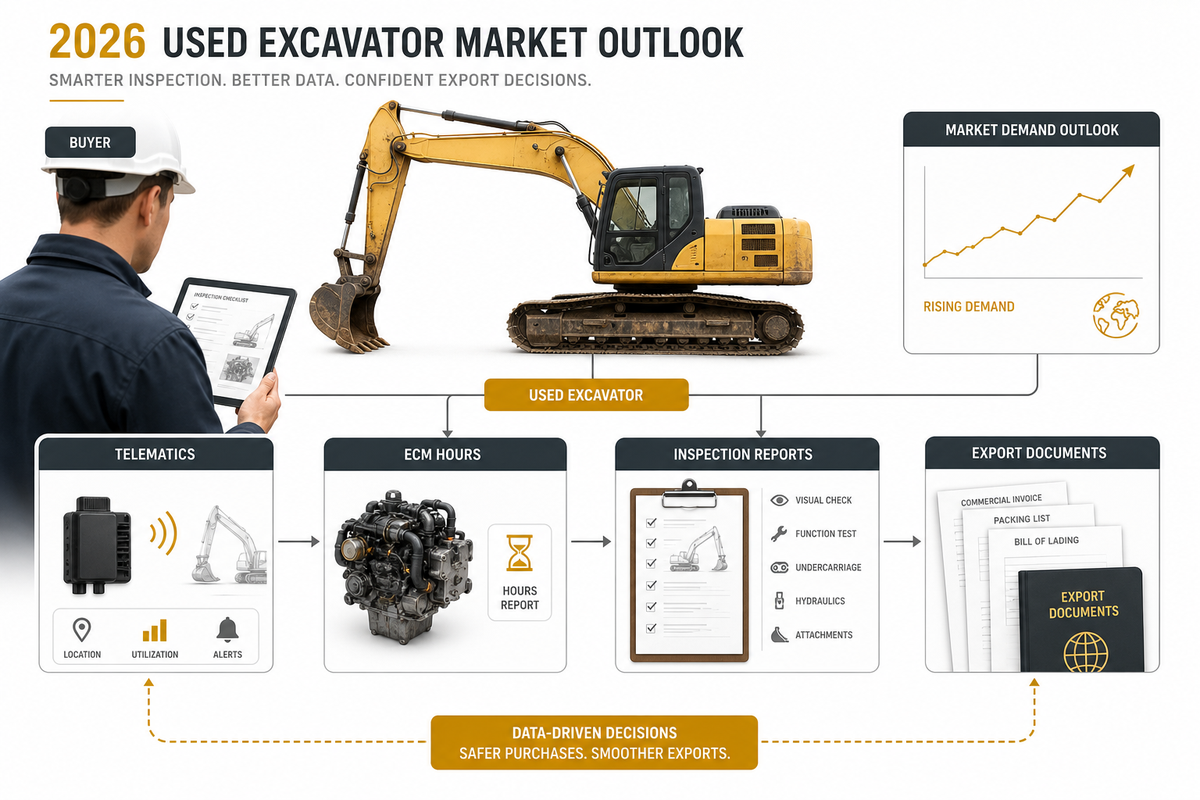
There are two changes in demand to consider as you make purchasing decisions in 2026. One is an increasing demand for used equipment. Industry analysts expect the market for used construction machinery to increase approximately 6% annually over the next several years, and up until at least the early 2030s. With increasing demand and a tightening supply, those familiar with inspections – with a solid grasp of what you’re measuring – gain a distinct advantage.
Second, telematics are altering the way hours are verified. Construction equipment telematics is expected to grow sharply in the U.S. in the coming decade, and that translates to a growing number of machines being equipped with an ECM tamper-proof record of their real operating hours. In plain terms, this gives buyers real negotiating clout: you’ll increasingly be able to tell a seller that you want them to pull their machine’s electronic hours and history instead of simply trusting its mechanical counter. For those in the market in 2026 and beyond, an ECM/telematics hour pull is an absolutely essential element of the process; it’s quickly moving into common practice and refusal itself has begun to carry its own suspicions.
Frequently Asked Questions
Q: How many hours is too many for a used excavator?
View Answer
No firm limits. Your typical 10-30 ton units start hitting the “look harder” range around 8-10K, and the minis sooner, but I’ve seen many low-hour machines sell that should have gone for scrap versus a high-hour machine that had an outstanding maintenance record. Don’t look at hours, service history, undercarriage, or test operation in isolation; weigh them against each other.
Q: What is the first thing to inspect on a used excavator?
View Answer
Start with a walk-around for any cracks and plating, then move directly to the undercarriage and hydraulics, where the largest repairs usually sit. Compare the hours with maintenance records, then use that context to judge everything else you uncover.
Q: Should I get a third-party inspection?
View Answer
Yes, especially when you cannot inspect the machine yourself or when the seller is overseas. A good inspector can measure the undercarriage, perform hydraulic tests, photograph the serial plate and wear points, and give you readings with photos so you know what you’re buying and what to expect from it. The fee is easier to defend when one hidden pump, swing bearing, or track repair can erase the savings from a cheap purchase price. Ask for the report before you wire a deposit, and make sure the inspector records the machine warm as well as cold.
Q: How much does a used excavator inspection cost?
View Answer
A self-inspection may only cost your time plus a basic measuring kit, often around $250. Professional third-party equipment inspections vary by region and machine size, but the fee is usually a small fraction of one major repair. That is why an inspection can pay for itself as soon as it reveals a weak undercarriage or leaking pump.
Q: Can I inspect an excavator I can’t visit in person?
View Answer
Yes. Request detailed photos and video of the undercarriage, cylinder rods, weld seams, and oil condition. Ask for ECM hours, service history, model and serial number, ownership history, export certificates, and any inspection or condition documentation. Before payment, have an independent third-party onsite inspection carried out. Good exporters should provide condition reports and load supervision.
Q: What paperwork should come with a used excavator?
View Answer
At the very least: service and maintenance documentation, an hour or ECM report, serial number, ownership history, and, for imports, export certificates plus any inspection or condition documentation. For newer machines, an OEM diagnostics history report gives useful information about how the machine was actually used.
Would you rather purchase a machine that has already been through this checklist?
All the used excavators we export are inspected, reconditioned, and tested, with condition reporting available on request.
Browse Inspected Used Excavators →Why We Published This Guide
As an exporter that reconditions and tests used excavators before shipping, we run undercarriage measurements and perform swing bearing and drift tests on every machine. We published this buyer’s guide so buyers can use the same logic, because the more you know about an excavator, the better buying decision you can make, whether you buy from us or anyone else. Who we are and where we are based is outlined on our about us page.
References & Sources
- 29 CFR 1926.1412 — Inspections — U.S. Occupational Safety and Health Administration (competent-person and periodic equipment inspection framework)
- Inspection Checkpoint: How to Inspect a Used Excavator – Equipment World (industry trade publication; methodology of appraiser)
- ISO 3471 — Roll-Over Protective Structures (ROPS) — International Organization for Standardization (operator cab rollover safety structure)
- Used Construction Equipment Market Outlook – Market Research Future (market forecast figures)