Get in Touch with Liehuang Company


Quick Specs
| Rotation range | ~1²0° (main-pin) to ~180° (progressive-link) |
| Common tine steel | AR400 (industry-nominal ~360–440 Brinell; hardness measured per ASTM E10 method) |
| Typical au×. hydraulic pressure | 1,500–²,500+ psi |
| Weight classes (AEM convention) | Mini <6t · Midi 6–10t · Standard 10–90t |
| Mounting methods | Main-pin, quick-coupler, stick-weld-on |
Excavator Thumbs are hydraulic or mechanical attachments that pivot against the bucket to clamp material a bucket alone can’t hold – logs, boulders, pipe sections, demolition debris – turning a digging machine into a material handler. An excavator thumb of the main-pin type typically rotates around 120°, while progressive-link designs extend that arc to roughly 180° for continuous grip through the full range of motion. That versatility is the whole point – a single machine goes from strictly digging to picking, sorting, and placing without a second attachment. This guide covers the engineering behind how thumbs actually work, why sizing follows real physics rather than a lookup table, what causes them to fail, and how to buy the best excavator thumb for your machine without repeating the mistakes documented in federal safety data. The fastest way to size an excavator thumb for your machine is to start from your bucket’s own dimensions, not a generic weight-class chart – the sizing section below explains why.
In this guide
- Rotation angle and clamping force are two different variables – a 180° thumb doesn’t automatically out-grip a 120° thumb.
- OSHA has logged 15 quick-coupler attachment-release incidents since 1998, 8 of them fatal – a hazard category every coupler-mounted attachment shares.
- AR400 is the industry-default tine steel not because it’s the hardest option, but because AR500 and AR600 trade toughness for hardness and crack more readily on impact.
- Clamping force follows Force = Pressure Cylinder Bore Area – a formula you can run with your own machine’s numbers.
- AEM’s mini/midi/standard weight classes are industry convention, not a binding international standard – boundaries vary by manufacturer.
What Is an Excavator Thumb?
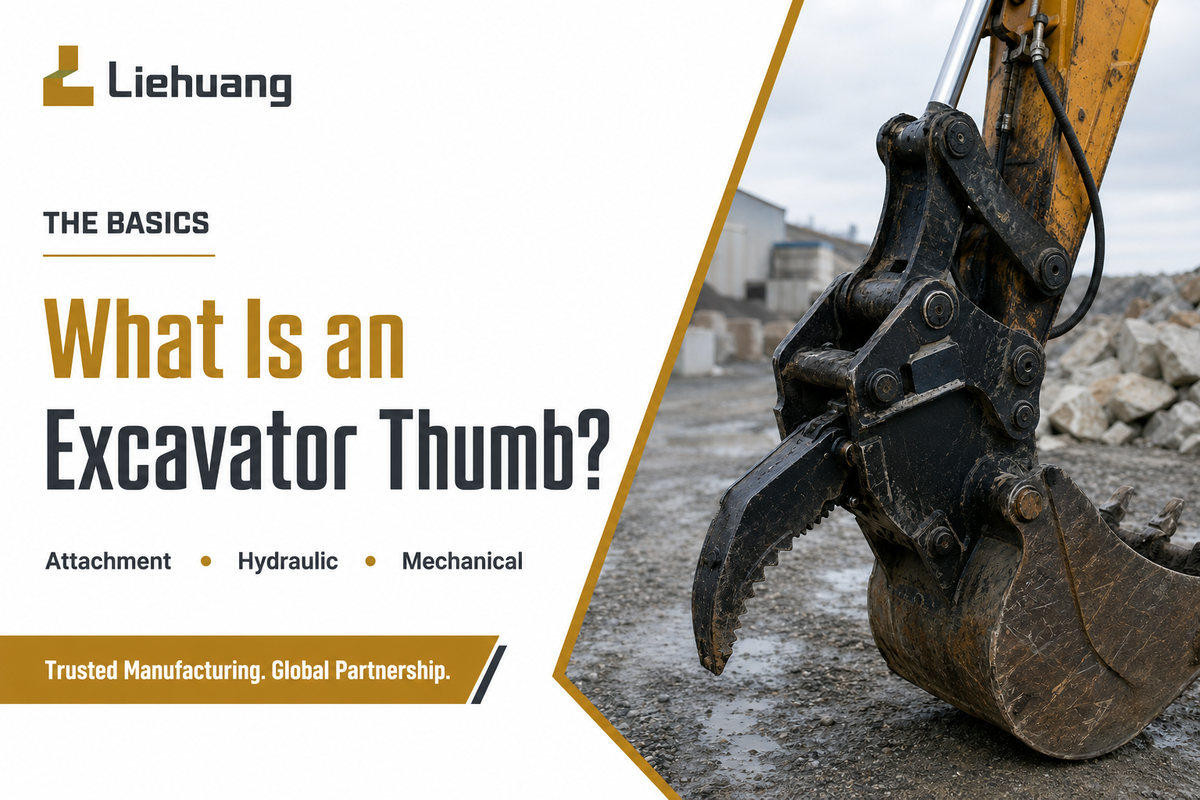
An excavator thumb pairs with the bucket the way a human thumb pairs with fingers – closing against it to trap an object rather than merely scooping it. ISO 6165 defines an excavator as a self-propelled, 360-swing machine “primarily designed for excavating with a bucket,” and an “attachment” as any assembly mounted to it for a specific task. That’s exactly what a thumb is: an add-on that converts a digging tool into a gripping one, without changing the base machine.
Terminology matters here: “thumb,” “claw,” and “grapple” get used loosely and interchangeably online, but they aren’t the same tool. Unlike a grapple, a thumb works opposite the existing bucket – you keep the bucket you already have and add a pivoting arm beside it. By contrast, a grapple (sometimes called a “claw”) replaces the bucket entirely with a two-jawed attachment built for high-volume debris handling, independent of any bucket. For precision work – picking a specific rock out of a pile, setting a pipe section, sorting rebar from broken concrete – the thumb’s advantage is that it keeps the bucket in play; for bulk material movement, a grapple built for a 20-ton-plus carrier typically clears more volume per cycle. This guide focuses on the thumb specifically.
Thumbs do a fairly specific list of things: clearing land (trees, brush, root balls), sorting demolition debris (rebar vs. concrete, structure), picking rock and stump, placement of pipes and riprap, general debris separation and site cleanup once the main dig is finished. What unifies all of these is a non-uniform, non-scoopable object that needs to be grabbed, lifted, and placed with precision, not just pushed around and dumped. That’s a range of handling tasks that justifies the thumb’s expense over an entire machine’s working life rather than just a single job.
How Excavator Thumbs Work, Hydraulic, Mechanical & Progressive-Link Mechanics
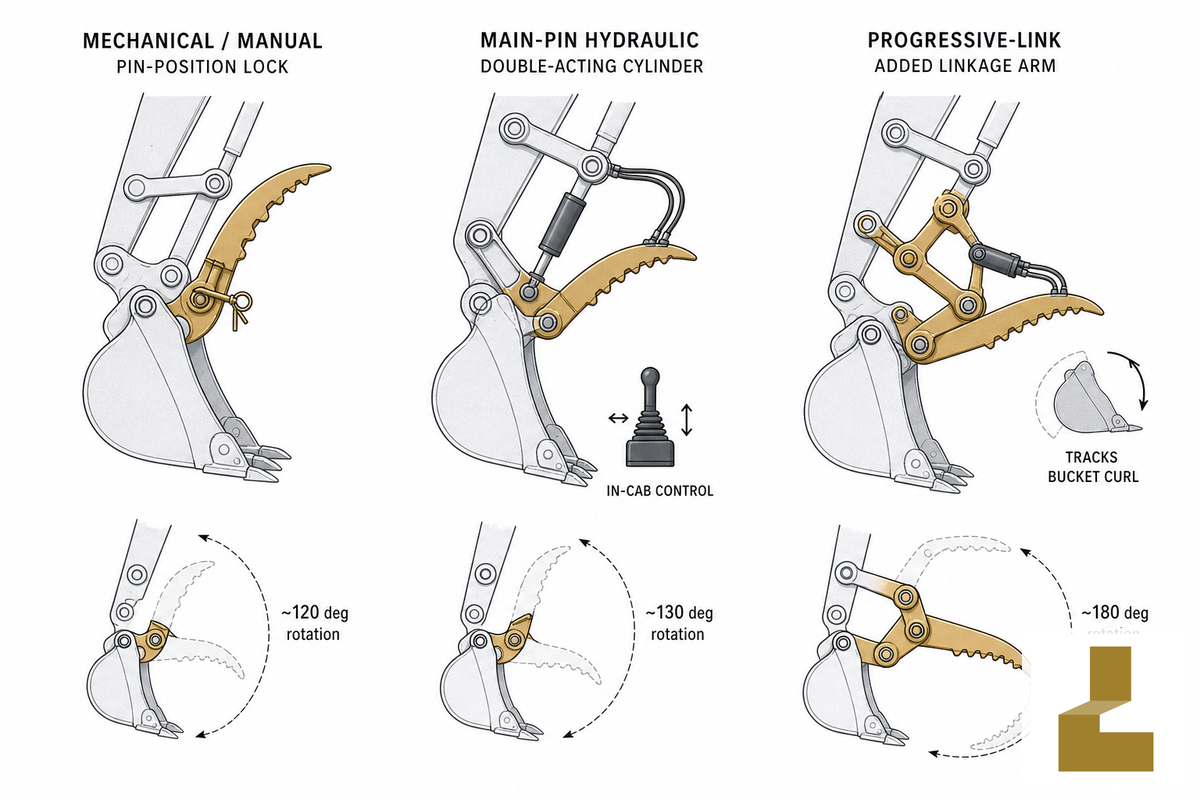
Three actuation families cover most of the market: mechanical (manual, pin-position, no hydraulics), main-pin hydraulic (in-cab variable control, roughly 120° of rotation), and progressive-link (a linkage extends usable rotation to about 180°). That difference is mechanical, not cosmetic, and it changes both cost and what can fail.
Mechanical (manual) thumbs pin into one of three or four positions with no hydraulic line at all — the operator gets out and repositions it by hand and re-pins it. There’s nothing to leak, nothing to pressurize, nothing to fail hydraulically, and because of that reliability, production crews running a single repetitive material still specify them today. A main pin hydraulic thumb replaces that cycle with a double-acting cylinder plumbed into the excavator’s auxiliary hydraulic circuit, which gives the operator variable control of clamping right from the cab — the mounting geometry itself follows the same basic-type definitions ISO 6165 sets out for excavator attachments generally. Progressive-link thumbs add a mechanical linkage between the cylinder and the thumb arm, causing the thumb to track the bucket’s curl through nearly its entire range. Both hydraulic designs sacrifice a bit of simplicity for genuine functionality — variable in-cab clamping control across a much wider range of material than any fixed-position attachment.
What’s the Real Difference Between a Manual and Hydraulic Thumb?
Choosing between manual and hydraulic is not just convenience — it’s a genuine trade-off in potential points of failure. A mechanical thumb is all but immune to hydraulic leaks or cylinder seal blow-by, with only the pin and bushings to wear over thousands of cycles. A hydraulic thumb adds a double-acting cylinder circuit and a control valve, so leaks, seal wear, and relief-valve adjustments become part of the ownership equation in exchange for variable in-cab control.
Machines doing just one type of material with uniform load characteristics are probably better served by the mechanical version; machines working varied demolition, sorting, or placement tasks are likely to find the added cost of a hydraulic unit worth the added expense.
“The hydraulic thumb has a much greater ability to grab different sizes of material. It can move with the bucket if you articulate it, and it gives you better placement options and better pickup options than a rigid thumb.”
Engineering Note — why rotation angle isn’t the same as clamping force
There’s a common misperception that the bigger the rotation arc the tighter the grip. They’re not necessarily linked – rotation arc describes the thumb’s range of operation (how far around the bucket it can work); grip is determined by cylinder size, system pressure, and the way the thumb tines meet the bucket’s teeth. It’s possible for a progressive-link thumb, rated for 180, and a main-pin thumb, rated for 120, to use the same cylinder and the same system pressure-but the progressive-link model holds a solid grip over a larger arc. You’ll understand why by reading the section below on clamping force.
Put into a balance of weighted advantages and disadvantages of each type – good for pairing cost-effective use and flexibility with real work rather than the spec sheet:
✓ Advantages
- mechanical: no hydraulic failure points, the cheapest and most durable under cycles of identical loads
- hydraulic: In-cab variable control of gripper force. Designed to operate on varying sizes of materials.
- progressive-link: maintains hold around the entire rotation arc. Ideal for large-sized everyday handling applications.
⚠ Limitations
- mechanical: operator needs to get out of the cab to adjust – costly operation when using different types of materials.
- hydraulic: A lot more work on wiring and control circuit needed, also needs repairs to hoses, fittings and seals.
- progressive-link: The heaviest and most expensive of the three, also creates an additional wear point with its connection
| Mount Type | Actuation Type | Typical Fit |
|---|---|---|
| Main-pin | Mechanical | Simplest, lowest-cost retrofit; best for repetitive uniform loads |
| Main-pin | Hydraulic | Most common configuration; in-cab control without a coupler’s extra length |
| Main-pin | Progressive-link | Full-arc grip on machines that don’t run a quick coupler |
| Quick-coupler | Mechanical | Uncommon — coupler mounts are usually chosen specifically for hydraulic convenience |
| Quick-coupler | Hydraulic | Fast bucket swaps without touching the thumb; needs a slightly longer thumb arm |
| Quick-coupler | Progressive-link | Full-size daily handling machines that also swap buckets often |
| Stick-mounted (weld-on) | Mechanical | Rare; most stick mounts are chosen when hydraulic control is the goal |
| Stick-mounted (weld-on) | Hydraulic | Permanent installation on a dedicated machine; two structural weld joints |
| Stick-mounted (weld-on) | Progressive-link | Least common combination; highest labor cost for the widest rotation |
Excavator Thumb Sizing Science, Why Weight Class, Tine Thickness & Pin Diameter Scale Together
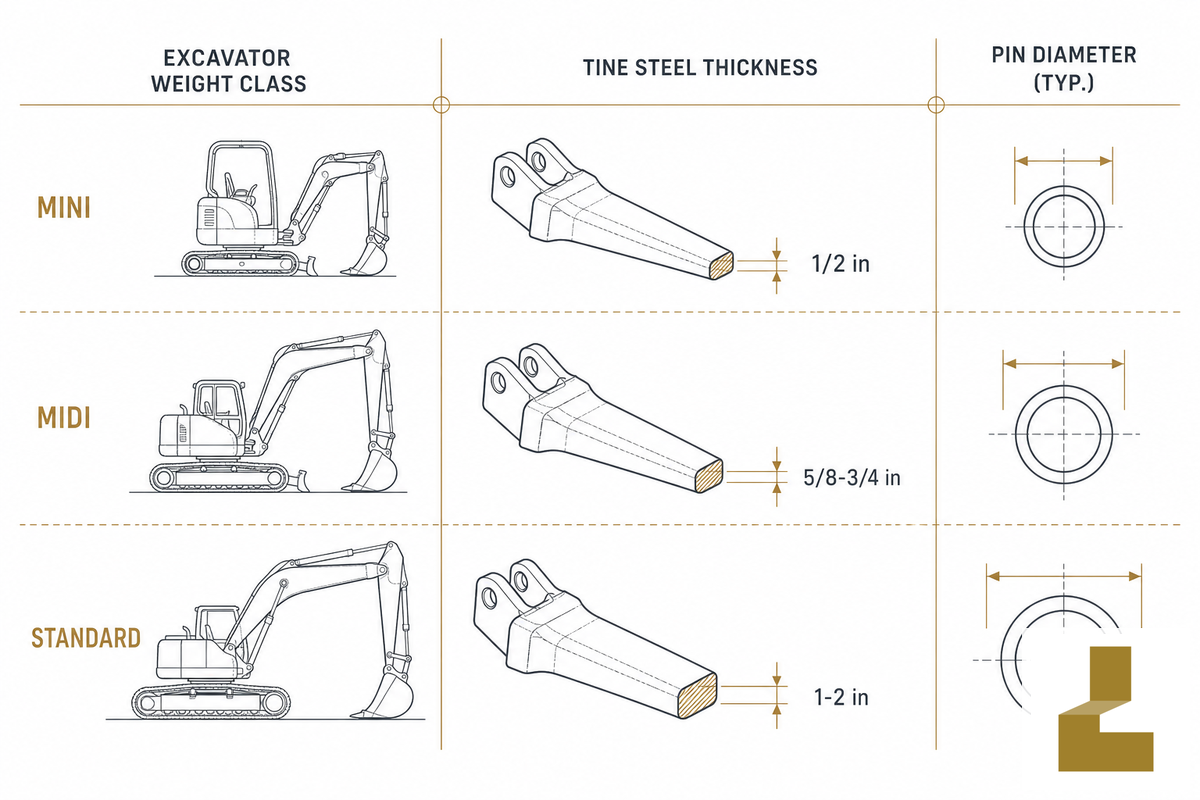
Thumb sizing is not a single lookup, and getting it wrong has a real cost: an undersized thumb bends or cracks at the pin under normal grip loads within months, while an oversized thumb throws off the machine’s balance and accelerates wear on the boom and stick pins it was never meant to carry. Load physics, not guesswork, is the underlying issue. The heavier the machine’s working weight, the more force — digging and grabbing — the excavator can impart through the arm and bucket, which means the thumb tine and pin have to withstand proportionally more load before bending or shearing. That’s why every dimension of a thumb — tine thickness, pin size, arm width and length — scales directly with machine weight class instead of being picked independently: a mini-class machine typically runs roughly 1/2-inch tine stock, a midi-class machine moves up to around 5/8-inch to 3/4-inch, and standard-class machines on the largest carriers move into the 1-inch to 2-inch range — and the pins carrying that load are hardened and ground to tolerance, not just cut to size, since a soft or undersized pin is where oversized thumbs typically fail first.
By far the most frequently encountered industry benchmark, however, the AEM’s three-level nomenclature – a ‘mini/compact machine’ at below 6-ish tons, a ‘midi machine’ from roughly 6 to 10 tons, and a ‘standard/full-size machine’ from some 10 to 90 tons – is as loosely defined as that may be. It’s probably worth dwelling for a second on what exactly that convention represents – the fact is it’s an industry convention that’s popular because of its familiarity; it is not, in itself, some hard and fast international rule (the cut-off tonnage from one maker to another does, in part, contribute to the fact that one dealer’s ‘mini’ is another dealer’s ‘compact standard.’) There is at least some attempt by ISO 6165 to specify objective quantitative limits in a few areas, particularly on ‘compact machines’ of less than or equal to 4,500 kg operating mass and ‘compact excavators’ of less than or equal to 6,000 kg; this is as near to a globally agreed, if informal, reference point for this equipment market as anything exists today.
How Do I Decide What Tine Configuration I Need?
Begin by referencing your existing bucket, not a thumb catalog. The tines must mesh with the bucket’s current teeth without crashing, so the industry standard pairing is an odd-toothed bucket with an even-tined thumb, so the tines land in the tooth spaces instead of on the teeth themselves — there is no universal, off-the-shelf fit, only a custom match built to your bucket’s actual numbers — Liehuang’s Tine-to-Tooth Mesh Checker tool walks through that comparison for your bucket.
Tine size, both thickness and number, scales the same way as everything else based on weight class; heavier machines with greater grip-force capability require thicker tines to resist bending under load, from about 1/2″ stock on the smallest machines to 1-2″ stock on the largest. Because the bucket’s tooth dimensions and spacing are specific to your machine/bucket combo, the reliable approach is to send the number of bucket teeth, the tip radius, and pin dimensions to whomever is speccing the thumb, rather than selecting by weight class alone — that’s what separates the best thumb for your specific machine from a generic, versatile-sounding catalog listing.
Mounting Mechanics & the Thumb Failure-Mode Decoder
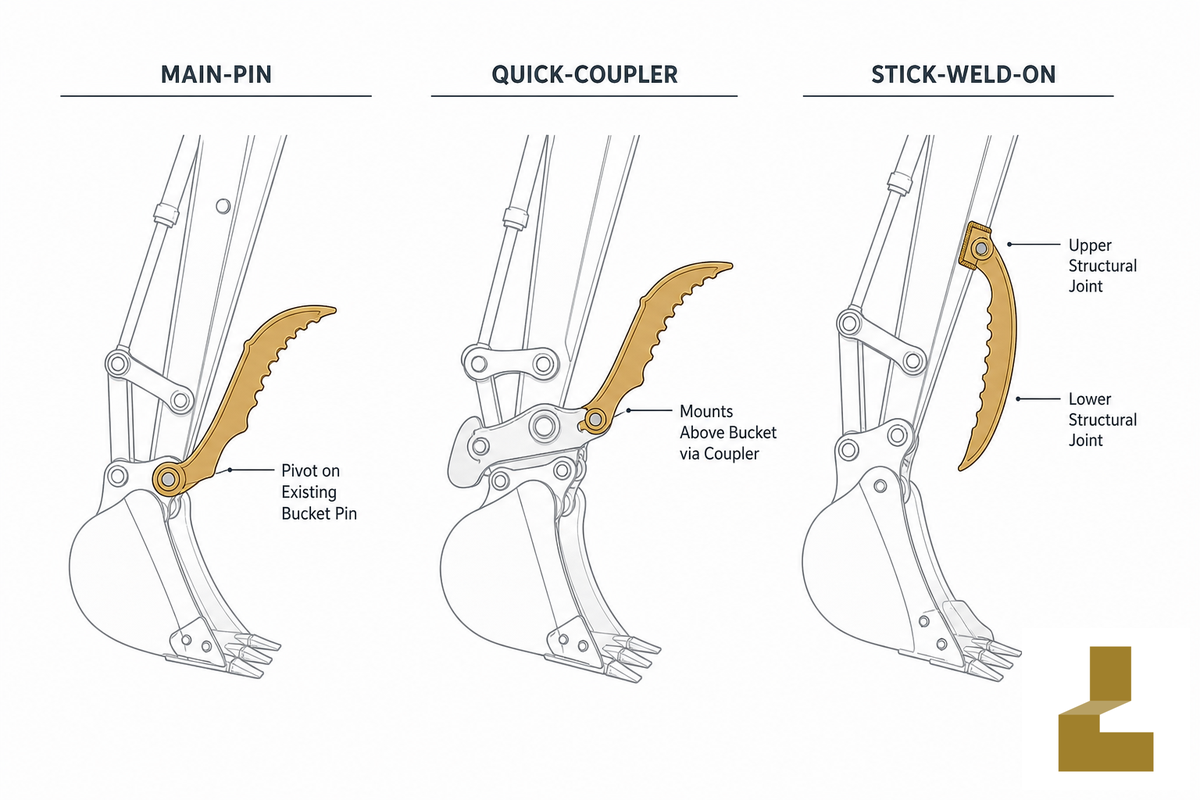
Thumbs attach to an excavator in one of three ways;main pin (pivoting on the machine’s own bucket pin – this is the easiest retrofit);quick coupler mount (sitting above the bucket via the coupler, which requires a longer thumb but allows easier swapping of buckets without removing the thumb); and stick mount/weld-on (bolted or welded directly to the arm – this involves the most labor, with two structural points to fab). Each attachment type has a distinct set of risks; however, two distinct types of risk tend to be confused in buyer guides: the risk of the attachment detaching from the machine, and the risk of the thumb itself wearing out and breaking. They’ve different etiologies and fixes.
Quick-Coupler Attachment Release, A Documented Federal Safety Issue
This is no hypothetical; OSHA’s Safety and Health Information Bulletin concerning hydraulic excavator quick couplers reports 15 incidents of unplanned bucket or attachment separation from quick couplers since January 1998 – 8 of which were fatal, most resulting from a coupler not being properly engaged or a recommended manufacturer’s locking pin never being installed. NIOSH’s 2024 quick-coupler struck-by hazards guidance identifies this as an ongoing safety priority directed at “employers, supervisors, and equipment suppliers,” applicable to any coupler-mounted attachment, including thumbs, and not solely buckets. OSHA’s construction equipment regulations (29 CFR 1926.602) group excavator attachments with base machines as the same type of regulated equipment. Bottom line: verify that the locking pin is in place and inspect it as a routine maintenance procedure.
9 Thumb Failure Modes Decoded
Separate from the coupler release risk is wear-related failure of the thumb itself, a recurring complaint reported by mechanics in the field. This 9-row diagnostic table is derived from documented field service and forum threads – view it as an initial diagnostic resource, but not as a replacement for manufacturer-specific maintenance instructions.
| Symptom | Likely root cause | What to check / do |
|---|---|---|
| Cylinder rod bent or won’t retract fully | Relief valve set too high, or thumb over-pressurized (2,500+ psi) against an immovable object | Confirm the aux circuit’s relief valve is set to the thumb manufacturer’s rated pressure, not system maximum |
| Thumb “sags” or drifts closed under its own weight | Air in the hydraulic line, or a worn spool/relief valve not holding pressure | Bleed the circuit; if sag persists, the spool or relief valve needs inspection, not the cylinder seals |
| Ear welds or mounting plate cracking | Side-loading — the thumb was used to pry or twist rather than clamp straight-on | Inspect weld beads at the ears after any twisting load; re-weld with matched low-hydrogen filler, don’t just grind and paint over a crack |
| Pin seized / won’t come out for service | Skipped greasing interval allowing corrosion or debris to pack the bushing | Weekly greasing is the standard interval on active job sites — a seized pin is a maintenance-schedule failure, not a defect, and the downtime it causes is avoidable |
| Switch or sensor misbehaves after wet conditions | Water ingress into the actuation assembly causing corrosion | Check connector seals after any submersion or heavy wash-down; dry and re-seal rather than replacing the whole assembly |
| Thumb won’t mesh flush with bucket teeth | Tine-to-tooth mismatch — wrong tine count for the bucket’s tooth spacing | Recheck the odd-tooth/even-tine pairing rule against your actual bucket before assuming the thumb is defective |
| Hydraulic hose fails at a fitting under pressure | Mismatched fitting thread (common on imported thumbs using metric DIN 2353 connections) or a hose past its service life | Confirm fitting thread type before first installation; inspect hoses for cracking or bulging on a routine schedule, not just after a failure |
| Reduced grip strength that wasn’t there when new | Worn tine tips changing the effective tooth-mesh geometry, or a slowly failing relief valve | Measure tine wear against original spec; if geometry is fine, pressure-test the circuit rather than assuming the cylinder itself is at fault |
| Bucket won’t fully open with thumb attached | Thumb not stowed in the correct back position, or interference from an incorrectly sized thumb | Cycle the thumb to full stow and check clearance against the bucket through its full curl before returning to work |
| Uneven wear across the tine faces | Consistent side-loading from a habitual prying motion rather than straight clamping | Retrain the operating technique; uneven tine wear is usually a usage pattern, not a material defect |
The installation process itself involves risk that can be easily under-appreciated. In a documented 2020 case, an equipment operator was hospitalized after a 2-in hydraulic hose came loose while he was replacing it on an excavator and sprayed high-pressure fluid that cut his hand. That incident highlights why trapped pressure must be relieved in a hydraulic line prior to opening it for service, not just during operation. Ohio State University Extension’s hydraulic-safety guidance confirms that fluid remaining in a system that has been shut down can carry more than 2,000 psi of pressure even when the pump is off. Both resources suggest cycling the control lever after shut-down to release this pressure.
Clamping Force, Cylinder Bore & Hydraulic Pressure, The Physics Behind “Grip Strength”
The Clamping-Force-to-Cylinder-Bore Index
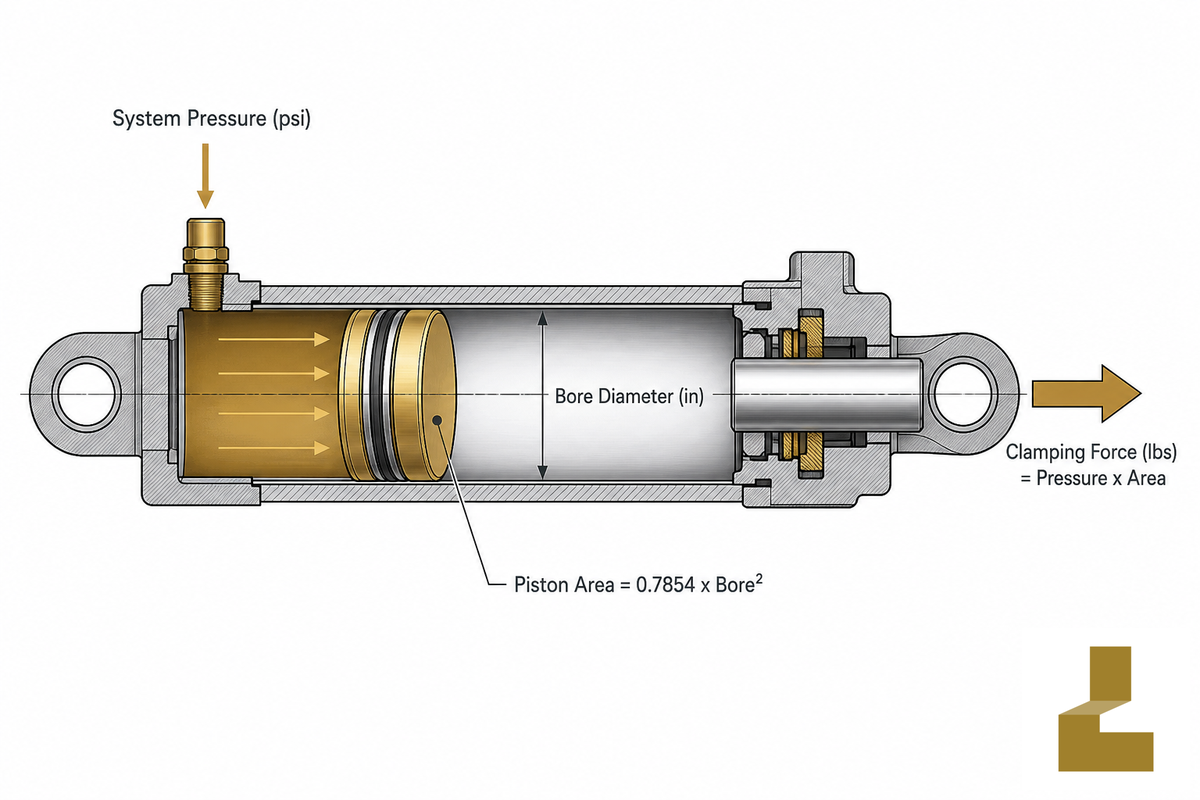
Clamping force of a hydraulic thumb follows a simple relationship: Force (lbs) = Pressure (psi) × Piston Area (in²), where piston area = 0.7854 × bore diameter squared. In a system using a 2.0-in bore cylinder at 1,000 psi, the piston area works out to 0.7854 * (2.0²) = 3.14 in2. That means the total force on the piston is 3.14 * 1,000 psi = 3,142 lbs. Reverse the calculation and a force of 5,000 lbs can be generated using a 3.0-in bore cylinder operating at approximately 5,000 / (0.7854 * 3.0²) = 5,000 / 7.07 = 707 psi. Northeast Wisconsin Technical College’s hydraulics course materials work through both directions of this calculation. Real hydraulic circuits also carry residual pressure even when the pump is off — Ohio State University Extension’s hydraulic-safety guidance puts that figure at 2,000+ psi on a shut-down system, which is part of why the working numbers above are theoretical maximums, not guaranteed field values.
📑 Engineering Note — run the numbers on your own machine
Auxiliary circuits on most excavator machines range from 1,500 to 2,500+ psi. A 3.0-in bore thumb cylinder with 2,000 psi could potentially create a clamping force of 0.7854 * (3.0²) * 2,000 psi = 7.07 * 2,000=14,140 lbs. That’s a theoretical maximum based on system pressure, and it doesn’t factor in the effect of the release-valve’s operating pressure or any loss of force from bucket/thumb geometry and lever-arm lengths at the tines themselves, which is exactly why manufacturers cite a working-pressure rating rather than a theoretical maximum based on the cylinder’s capability.
That explains why the “larger angle=stronger grip” argument fails to be true for mechanically and other brands. The best example comes from an equipment operator’s demonstration video (Diesel and Iron YouTube channel), showing a thumb cylinder’s relatively narrow diameter can’t apply the same force as a bucket’s that has a broader diameter, no matter how much the thumb cylinder rotate. The effective force generated also diminishes considerably if the bucket tines aren’t properly interlocked by at least a full tooth-width with the thumb’s tines. The degree of rotation angle, the size of the cylinder’s bore, system pressure and how well the tooths interlock are four completely separate variables which companies frequently pair together in their marketing, creating a false correlation between rotation angle and clamping force.
Steel & Metallurgy, Why AR400 Wins Over AR500/AR600 for Thumbs
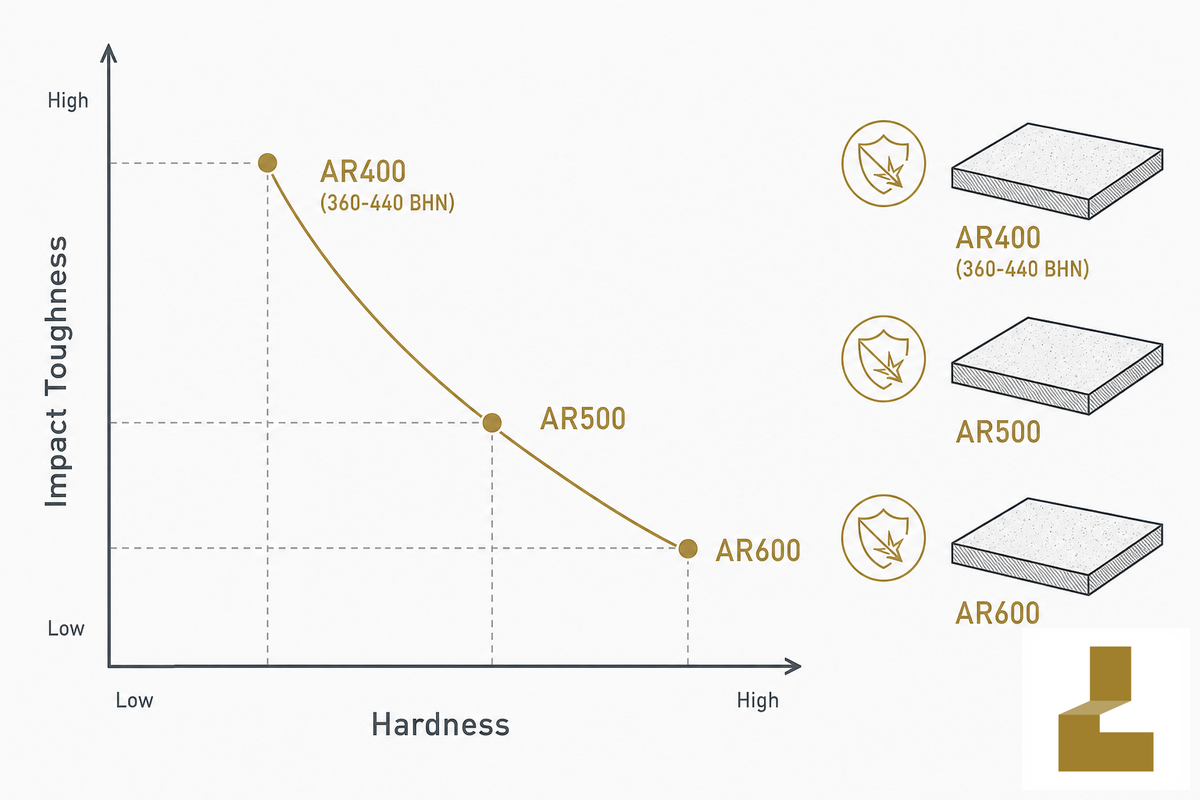
Tine and structural steel hardness is assessed with the Brinell system using ASTM E10, the test procedure in which a hardened ball is pressed into a piece of material and the impression created by this force is measured in order to obtain the Brinell Hardness (HB). Those trade names for AR400, AR500 and AR600 are founded upon this measure -not official ASTM grade names- in which AR means abrasion resistant steel plates of approximate hardness levels of 400, 500, and 600 Brinell.
Not all hard is created equal. Steel suppliers commonly rate AR400 at a nominal 360-440 BHN — an industry convention, not an ASTM-assigned figure — and at that range it falls at an ideal equilibrium between abrasion resistance and impact toughness: it’s hard enough to hold up to impact, but tough enough to resist cracking when it is subjected to the repeated impact loads encountered when clamping rock, demo material, and stumps. AR500 and AR600 achieve greater hardness at the direct expense of impact toughness, which is why they perform much better for sliding wear (such as mining chute liner) than they do for a component experiencing repeated impact/shock loads.
Also in practice, due to the added toughness AR400 welds more predictably and reliably with standard low-hydrogen electrodes, whereas the harder grades require a controlled heat input to prevent degrading the tempering that provided its hardness to begin with. Finally, as a frank, and important, clarification: since the “AR” grades are trademarked, not standard ASTM numbers, not all vendors’ “AR400” steel is the same chemically — a material cert and documented weld-process report, ideally from an ISO 9001-audited supplier, are what actually verify the material supplied, not just the trade name on an invoice.
From Patent to Product, The Engineering Evolution of the Excavator Thumb
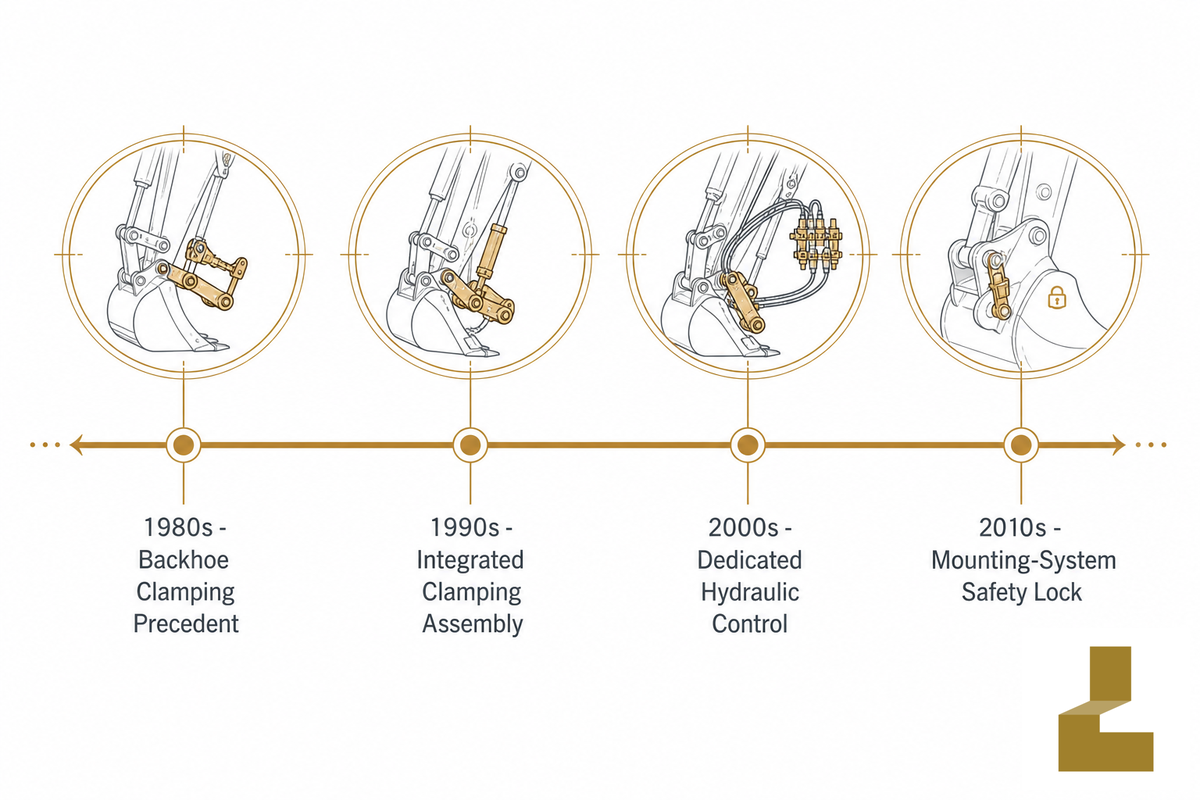
The Excavator Thumb Patent Timeline
The patent history of the excavator thumb spans more than 30 years of U.S. patent filings, from a 1980s priority filing through a 2013-issued mounting-safety patent. Reading the actual claim documents, not just the patent numbers, shows a clear evolution of the engineering approach across five distinct design generations.
1980s — the backhoe clamping precedent. The US 4,519,739A patent illustrates an early type of clamping apparatus. In this device, a lever operated via a backhoe’s existing controls moves the clamping arm — the conceptual starting point for using an excavator’s inherent shape and movement to power a clamp, instead of requiring a specific thumb cylinder.
1990s — movement toward integrated clamping assemblies. A patent filing from the mid-1990s describes a clamping assembly attached to a bucket that works “much like a thumb.” It indicates a movement away from modified linkage systems towards specific purpose-designed attachments. Around the same period, JPH05248160A (Caterpillar) obtained a patent for a hydraulically actuated pipe gripping assembly used in pipe laying, consisting of a pair of opposing jaws pivoted about the same point and closing on a wedge principle. This is claw-style geometry rather than bucket-opposed geometry, and comparing the two designs side by side is instructive for seeing the structural difference between a claw and a thumb.
Early-to-mid 2000s — dedicated hydraulic thumb control. US 6,385,870 B1, “Control system for an excavator thumb and a method of controlling an excavator thumb,” is the clearest single patent anchor for the modern hydraulic thumb: a cylinder-driven closing motion with a control circuit that maintains a constant closing force until the operator releases it-the direct technical ancestor of the in-cab variable-grip control every hydraulic thumb offer today. A related filing, US 2007/0220782A1, positions the thumb’s pivot above the bucket’s own axis and shares the bucket’s hydraulic cylinder rather than running an entirely separate one-an efficiency refinement on the mounting geometry.
Late 2000s – multi-purpose bucket integration. US 2011/0078930A1 folds the thumb into a broader multi-purpose bucket arrangement-a six-tine bucket geometry with the thumb as one of several optional hydraulically driven features rather than the sole invention, reflecting how thumb designs increasingly get engineered alongside bucket geometry instead of as a bolt-on afterthought.
Early 2010s – mounting-system safety. US 8,347,974 B2 covers a quick-coupler safety locking device with a spring-preloaded secondary lock on an independent hydraulic supply from the primary wedge lock-a dual-circuit fail-safe specifically designed against the exact quick-coupler release hazard documented in the OSHA and NIOSH data cited above. This timeline’s most recent development is a safety response to a problem the earlier patents didn’t address at all.
Where to Buy, Market Landscape & What to Verify Before You Order
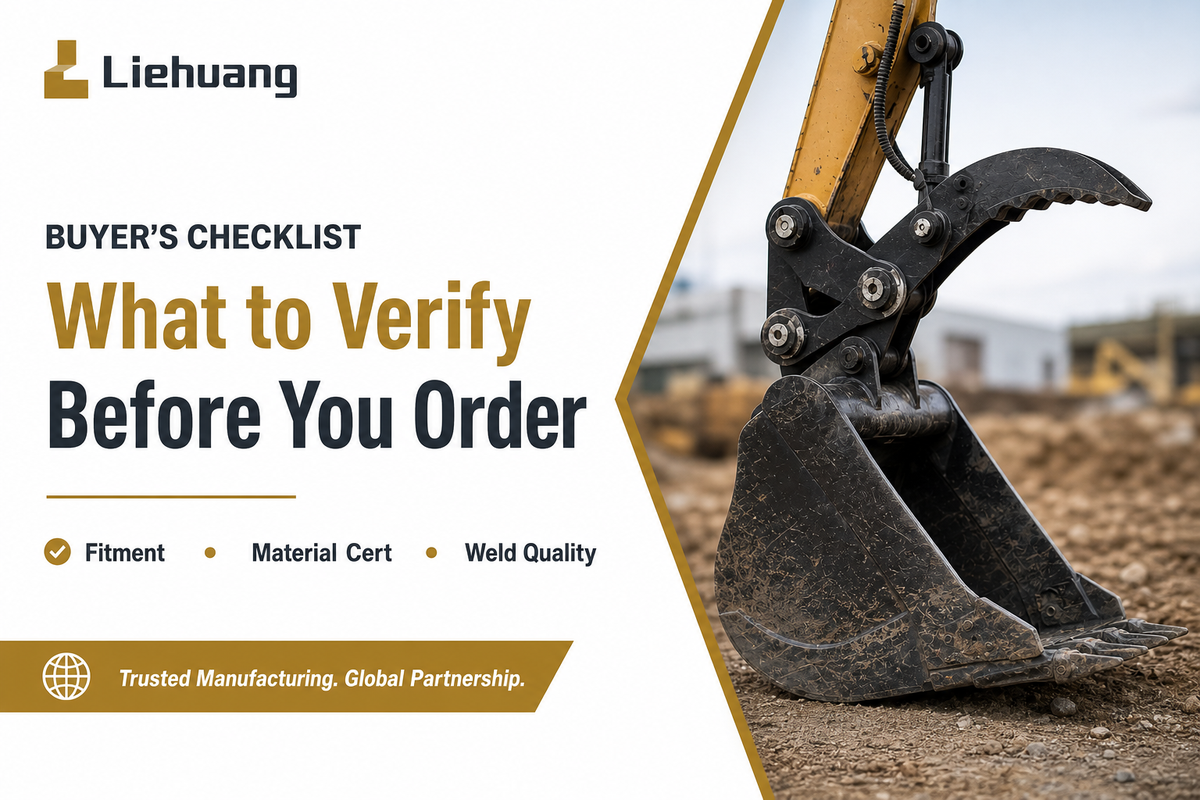
Pricing spans roughly $140 for small bolt-on kits to $8,000+ for heavy-duty units on full-size machines, driven by thumb type, machine weight class, tine configuration, mount style, and order volume — there’s no single “market price” for an excavator thumb, only a price band that shifts with those variables from one order to the next.
Rather than repeating unverifiable pricing claims, the more useful buyer question is what to verify before ordering, regardless of who you buy from — whether that’s a domestic dealer or a factory-direct exporter with in-house ISO 9001 production and material-certification records:
- bucket tooth count, tip radius, and pin dimensions supplied to the seller for a real fitment check-not a “fits your excavator” guess
- A material certificate for the tine steel, not just a trade-name claim (“AR400” alone doesn’t guarantee chemistry)
- Documented weld quality at the ears and mounting points-photos or inspection records, since this is where side-loading failures concentrate
- Confirmed availability of spare pins, bushings, and seals-a thumb with no parts supply chain is a liability the day the first pin wear out
- A quick-coupler with a secondary locking mechanism if the thumb mounts through one, given the NIOSH coupler-release incident data covered above
How Much Does It Cost to Add a Hydraulic Thumb to an Excavator?
Besides the price of the thumb itself, figure in the cost of the auxiliary hydraulic circuit if your machine isn’t equipped with one — a dedicated pressure and return line, an in-cab control valve, and matched fittings (many imported cylinders use metric DIN 2353 connections a local shop might not stock). A mechanical thumb skips this expense entirely.
Labor will range from roughly two to three hours for a simple pin-on or weld-on job to a full eight-hour workday when auxiliary hydraulic lines have to be run, tested, and pressure-rated. Liehuang’s excavator thumb range includes adapter fittings matched to your machine’s mount size, so this exact problem is solved.
Industry Outlook, Why Progressive-Link Demand Is Rising

Demand for progressive-link thumbs has spiked over the most recent months tracked, compared to earlier in the same 12-month window. That pain point is concrete: a contractor running a main-pin thumb on a mixed demolition job routinely has to stop, reposition the excavator, and re-approach a piece of rebar or a slab fragment simply because the thumb lost usable clamping engagement once the bucket curled past the cylinder’s effective travel — every one of those repositioning moves is dead cycle time that doesn’t move material. Progressive-link designs solve that specific problem with a mechanical linkage that keeps the thumb tracking the bucket through nearly its full arc, so grip doesn’t fall off at the angles where a main-pin thumb runs out of range. For a crew doing eight or ten hours of varied demolition and sorting a day, cutting even a handful of repositioning moves per hour compounds into a real productivity difference, independent of what any market-size forecast says. As a directional data point, DataForSEO search volume for “progressive link thumb” roughly doubled in the most recent quarter of the tracking window versus the earliest quarter tracked — worth noting if your machine spends a meaningful share of its cycle time on varied handling rather than pure digging, though this is a single-window signal, not a confirmed multi-year trend.
Quick-coupler regulation has also recently undergone a significant update, and it directly bears on the coupler-release risk covered earlier in this guide — a buyer who specs a thumb without checking coupler compliance is inheriting a hazard category regulators are actively tightening, not a settled one. The international quick-coupler safety standard, ISO 13031, was reconfirmed after a systematic review in 2022 and picked up a published amendment in 2025, and NIOSH released new quick-coupler struck-by guidance in 2024. Both publications place a direct focus on the attachment-retention hazard that was detailed earlier in this report. Given that recent activity, confirming that any quick-coupler system (including the thumb) is equipped with a secondary locking mechanism that complies with the current version of that standard is a sourcing question buyers should be asking suppliers directly, rather than assuming it as a given. Market size predictions for the excavator attachments category differ greatly among research firms and should be viewed as general indicators only; your individual purchasing decision will likely be influenced more strongly by the engineering advancements and regulatory developments mentioned above.
Excavator Thumb FAQ
Q: What is an excavator thumb?
View Answer
An excavator thumb is a hydraulic or mechanical attachment that pivots opposite the bucket to clamp irregular loads – rocks, logs, pipe, demolition debris – that a bucket alone can’t hold securely. It mounts through the machine’s existing bucket pin, a quick coupler, or is welded to the stick, and turns a digging machine into a material handler without replacing the bucket already on the machine.
Q: What is an excavator claw called?
View Answer
In the trade, “claw” is typically used interchangeably with “grapple” – a two-jawed attachment that replaces the bucket entirely and is built for high-volume debris and material handling. That’s a different tool from a thumb, which works alongside the existing bucket rather than replacing it. If your job is mostly precise picking and placing, a thumb is the better fit; if it’s bulk clearing, a grapple typically clears more material per cycle.
Q: What are the different types of excavator thumbs?
View Answer
Three main types: mechanical (manual pin-position, no hydraulics, lowest cost and fewest failure points), hydraulic main-pin (continuous in-cab control across roughly 120° of rotation), and progressive-link (a linkage extends usable rotation to about 180° so grip holds through more of the bucket’s curl). Mounting is a separate decision from actuation type: main-pin, quick-coupler, and stick-weld-on mounts each pair with more than one actuation type, so pick actuation for the work and mounting for the machine you already run.
Q: Who makes excavator thumb attachments?
View Answer
Both OEM lines and independent factory-direct manufacturers build excavator thumbs; neither has a monopoly on quality. What separates a good supplier is whether they’ll confirm fitment against your bucket and pin geometry, and document the tine-steel certificate behind the build.
Q: Does the thumb fold back out of the way when not in use?
View Answer
Yes, on both hydraulic and mechanical designs the thumb stows back against the stick so the bucket digs freely. A hydraulic thumb stows on a cylinder command from the cab; a mechanical thumb needs a manual reposition to the stowed pin.
Q: What is the range of motion of a progressive-link thumb?
View Answer
About 180°, versus roughly 120° on a standard main-pin thumb. This added linkage keeps the thumb tracking the bucket’s own curl instead of running out of cylinder travel partway through, so it holds usable grip through nearly the full arc.
Q: What should I check before I buy?
View Answer
Five things matter more than the price tag: real bucket fitment data checked against your machine, not a guess; a material certificate for the tine steel; documented weld quality at the mounting ears; confirmed spare-parts availability; and, if it mounts through a quick coupler, a secondary locking mechanism rather than the coupler jaws alone. Skipping any one is how buyers end up with a thumb that looks right on paper but doesn’t hold up in the field.
Why We Wrote This
Liehuang built this guide because every competing resource reviewed during research made rotation-degree and clamping-force claims with no cited source, and none mentioned the federal safety data on quick-coupler release. This version is built around verifiable sources instead: OSHA and NIOSH safety data, ASTM and ISO standards, and the actual patent text behind the thumb’s design history. Reviewed by the Liehuang technical team.
References & Sources
- Hazards of Inadequately Securing Hydraulic Excavator Buckets When Using Quick Coupling DevicesU.S. Occupational Safety and Health Administration (SHIB 07-22-2005)
- Preventing Excavator Quick Coupler Attachment Struck-by Fatalities and InjuriesNational Institute for Occupational Safety and Health (Publication 2024-102)
- 29 CFR 1926.602, Material Handling EquipmentU.S. Occupational Safety and Health Administration
- OSHA Accident Report 126603.015U.S. Occupational Safety and Health Administration
- Safe Use of Hydraulic Systems (AEX-591.2.5)Ohio State University Extension
- How to Calculate the Force Output of a Hydraulic CylinderNortheast Wisconsin Technical College (Engineering LibreTexts)
- ISO 6165:2022, Earth-moving Machinery, Basic Types, Identification, Terms and DefinitionsInternational Organization for Standardization
- ASTM E10-23, Standard Test Method for Brinell Hardness of Metallic MaterialsAmerican National Standards Institute
- US 6,385,870 B1, Control System for an Excavator ThumbUSPTO / Google Patents
- US 8,347,974 B2, Safety Locking Device for Quick CouplersUSPTO / Google Patents (Cascade Corp.)
Related Articles
- Excavator Thumbs, Liehuang’s full hydraulic & mechanical thumb range, sizing chart and factory-direct pricing
- Excavator Attachments, buckets, hydraulic breakers, grapples and other tools by machine class
- Used Excavators for Sale, browse inspected Cat, Komatsu, Volvo and Kubota machines by tonnage class
- Mini Excavators (0–10 Ton) — compact machines for landscaping and confined-site work
- About Liehuang, inspected used excavators and attachments, factory-direct from China
![Excavator Bucket Manufacturers: Buyer Evidence [Guide]](https://lhusedexcavator.com/wp-content/uploads/2026/08/excavator-bucket-manufacturers-r2-featured-768x512.png)